
Configuring the settings
Overview video
The following video walks through how to configure the settings.
See below for a step-by-step written description of how to configure the settings for each project.
Edit the settings for the project
- Press the blue Edit button at the top right-hand side of the page.
- The Project setting form is displayed.
Enable the app for this project
Select the option Enabled for project.
The app will not send any notification emails for this project unless the Enabled for project option is checked.
Email template settings
The app uses the same templating format and variables used in the Jira Service Management's own notification system.
For the app's notifications emails to be consistent with those sent by Jira Service Management itself, it is necessary to copy over some configuration.
To copy the settings from Jira Service Management:
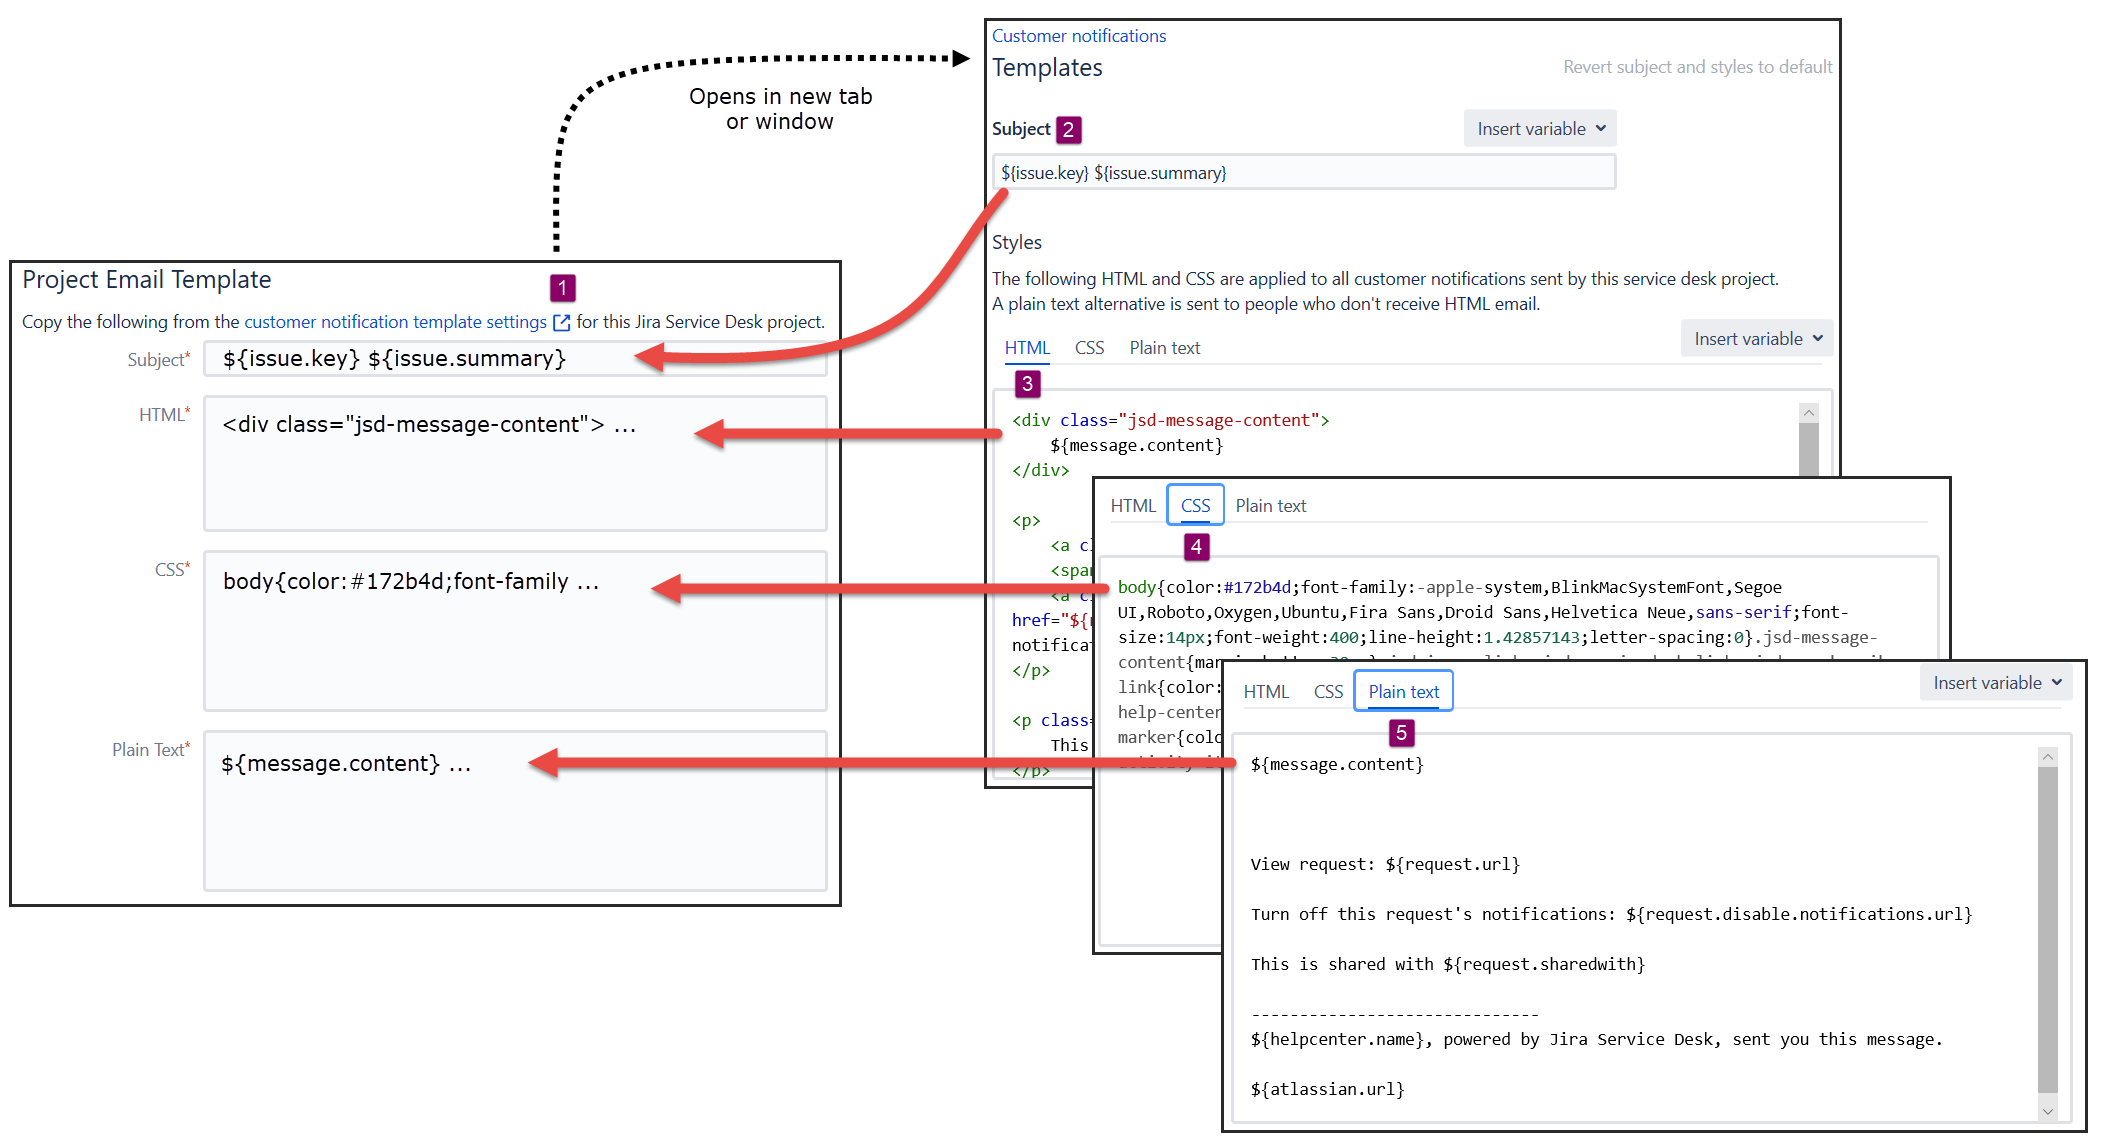
- From the app settings page, click on the customer notification template settings link. The Jira Service Management Customer notifications > Templates settings page will open in another tab or window.
- Copy the Subject setting string to the app settings form.
- Under Styles, copy the HTML string to the app settings form.
- Repeat for CSS by clicking on the CSS tab and copying the setting to the app settings form.
- Finally, repeat for Plain text.
Notification rules
Again, the app uses the same approach for defining the recipients and content for notification rules as Jira Service Management itself.
The two events that the app replaces are:
- Public comment added
- Public comment edited
Public comment added
To copy over the settings for public comment added:
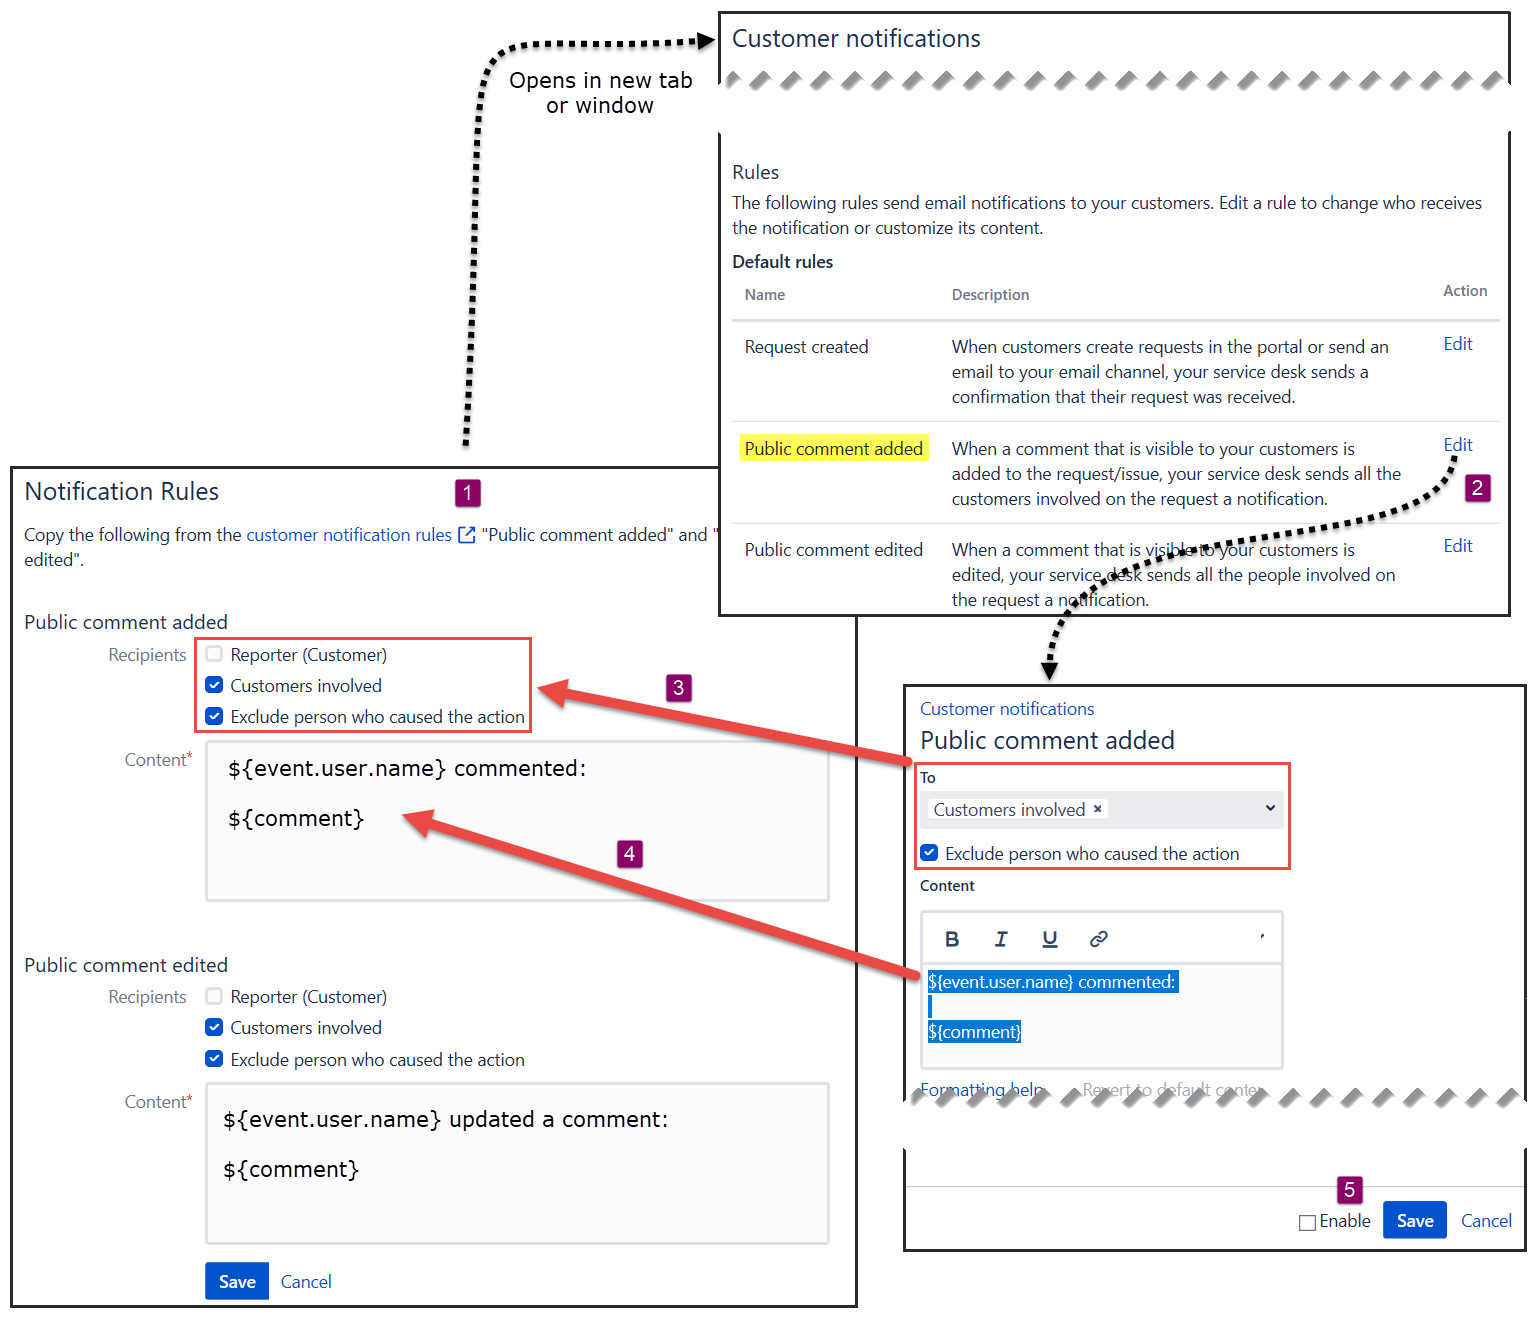
- From the app settings page, click on the customer notification rules link. The Jira Service Management Customer notifications settings page will open in another tab or window. Scroll down to the Rules section.
- Click on the Edit button for the Public comment added default rule. The settings page for that rule will be displayed.
- Set Recipients checkboxes in the app based on the To and Exclude person who caused the action settings in the Jira Service Management rule.
- Copy the text of the Content setting to the app settings form.
- At the bottom of the Jira Service Management setting page, uncheck the Enable option and press Save.
If you do not uncheck the Enable option in step 5 above, two notification emails will be sent to your users – one from the app and another from the standard Jira Service Management notification rule.
Public comment edited
The steps for Public comment added need to be repeated for Public comment edited.
From the customer notification rules page opened in step 1 above:
- Click on the Edit button for the Public comment edited default rule. The settings page for that rule will be displayed.
- Set Recipients checkboxes in the app based on the To and Exclude person who caused the action settings in the Jira Service Management rule.
- Copy the text of the Content setting to the app settings form.
- At the bottom of the Jira Service Management setting page, uncheck the Enable option and press Save.
- In the app settings, press the Save button at the bottom of the form.
If you do not uncheck the Enable option in step 4 above, two notification emails will be sent to your users – one from the app and another from the standard Jira Service Management notification rule.
Also, changes will not be saved without pressing the Save button.

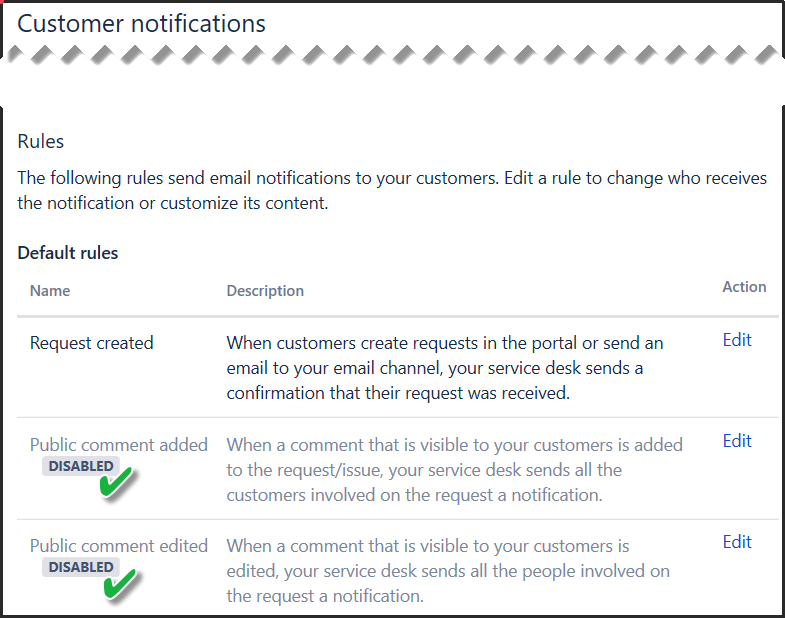
Check built-in notification rules are disabled
After following these steps, the default rules in Jira Service Management should look like this:
Reply-To addressing
By default, the app sends notification emails using the From address specified in the Jira Outgoing Mail settings (Atlassian support).
If you have added an email channel to your Jira Service Management project to handle incoming requests by email you may wish to use this address instead. Also, the most recent versions of JSM on Data Center allow multiple email channels to be added to a project, with incoming emails being routed to specified Request Types.
The following settings allow you to optionally add a default Reply-To address for outgoing notifications and also add additional email addresses for comments added to specific Request Types.
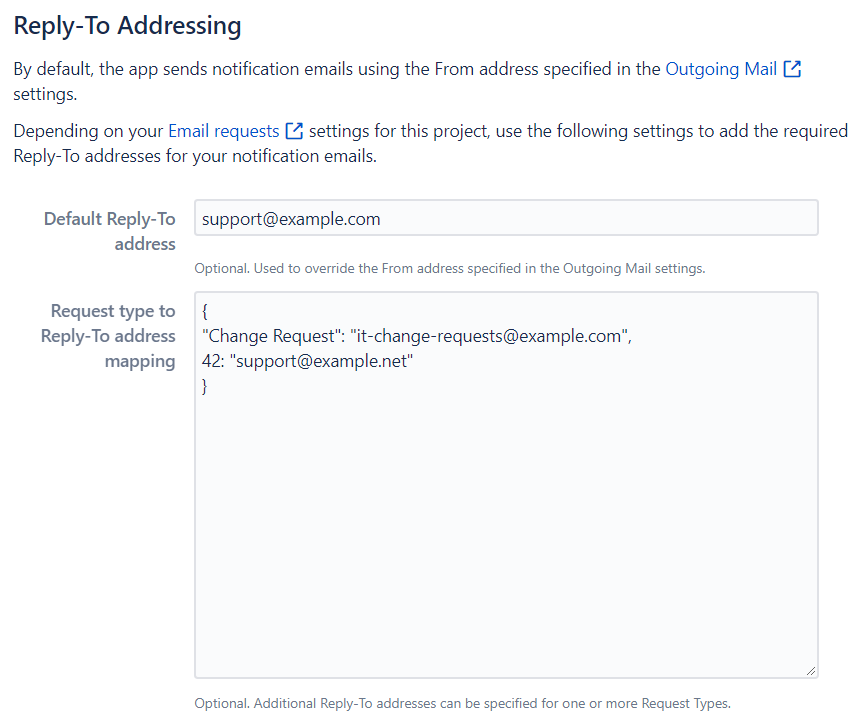
Default Reply-To address
This setting specifies the Reply-To address to use by default. If you only have one email channel specified for your project, no further settings are required.
Request type to Reply-To address mapping
To handle Request Type-specific addressing you can optionally provide a mapping as a JSON dictionary, with the Request Type name as the key and the Reply-To address as the value.
An example is provide below.
Request Type names are case-sensitive and should be an exact copy of the name in the Service Desk configuration.
Remember to separate entries with commas and include the leading and trailing {} characters.
Unspecified Request Types
Any unspecified Request Types will fall back to the Default Reply-To address specified above or the Outgoing Mail From address if no default is set.
Numeric IDs
If you have more than one Request Type with the same name, you can use the integer ID instead.
To find the ID of a Request Type:
- In the Project settings for the project, find Request types in the menu on the left-hand side and click on it. All the request types for this project are displayed.
- Find the type that you need and click on the Edit fields link.
- The URL of the page displayed will end with the ID.
e.g. http://host.example.com/jira/servicedesk/admin/TEST/request-types/request-type/42
Example
{
"Change Request": "it-change-requests@example.com",
42: "support@example.net"
}